Hellsinker
Hellsinker. (ヘルシンカー) is a doujin bullet-hell shoot-em-up developed by Ruminant's Whimper for PC in 2006 and re-released on Steam in 2019. Its defining gameplay features are its multiple gauges that affect your attack strength, its enemies with multiple parts to strategically dismember, and its three different tracked scores (Spirit, Kills, and Tokens). The game is also often noted for its unique, sometimes inscrutable, lore and aesthetic. The story follows 4 members of the mysterious organization GRAVEYARD as they attempt to reach and infiltrate the Cardinal Shaft, a giant tower responsible for the end of the world.
IS
CONFLICT WITH US
KEEP YOUR DIGNITY
For replay videos, visit the Video Index.
Contents
Gameplay Overview
Hellsinker. is a four-button game with 4 playable characters (one of which has 4 different load-outs, for an overall total of 7) and 9 levels (referred to in-game as "Segments") in the main game. There are also unlockable, harder versions of the first 3 Segments (unlocked by 1CC-ing Segment 4) and 2 Extra Segments, unlocked by defeating the game's TLB. There are three scoring systems:
- Spirits, orthodox but esoteric scoring involving grazing, destroying enemy parts, milking enemy value, collecting Extend bonuses, et cetera. Overlaps with the other two systems somewhat.
- Kills, destroying the most enemies and enemy parts. Usually revolves around speedkilling to spawn extra enemies.
- Tokens, collecting unorthodox items which fall upwards, chaining them as much as possible to increase the value of each token. Tokens are produced from destroying enemies and cancelling bullets.
Controls
- C (Press): Main shot. Tapping rhythmically enables rapid fire. Tapping too fast is detrimental as it will drain LUNA while providing no benefit.
- C (Hold): Charge attack. Some shots have autofire ability as well.
- X (Press or hold): Subweapon. The mechanics of this attack vary whether the button was pressed or held, and whether the subweapon gauge is filled to level 1 or 2.
- Z: Discharge attack (bomb). Discharge attacks clear the screen of bullets and make the player character invincible for some time.
- V: Activate slow movement. The exact behavior of this button is dependent on the "Speed Control" setting. Fossilmaiden uses this button to control her aiming direction instead.
There are some additional controls that apply only to some characters:
- C (Tap rapidly): Additional shot weapon.
- C (Hold) + X: Additional subweapon.
- Z (Hold): Delay discharge detonation. Invincibility is still applied immediately.
HUD
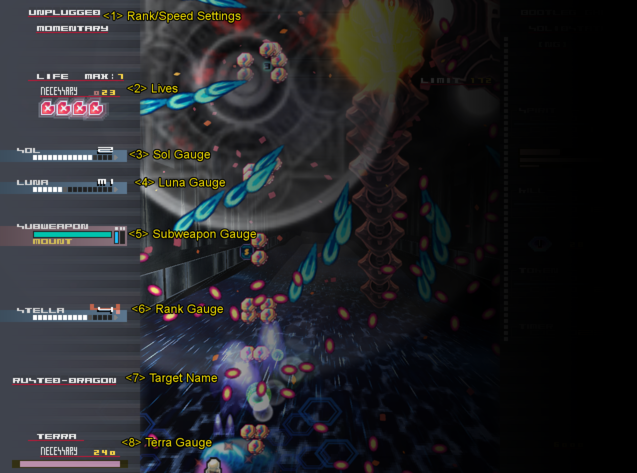
The lefthand side of the HUD focuses on gameplay features and contains vital information for any player. Additional information is below:
- Rank and Speed settings. Set before a run starts. Rank settings do not work outside Practice mode.
- Lives. Lives are indicated by the heart containers. Max denotes the maximum number you can stock at once, set before the run. The NECESSARY counter tracks Extend progress; when it falls below 0 you earn an Extend.
- SOL gauge. SOL determines the strength of your main shot and bombs. Levels are from 1 to 5, excluding Fossilmaiden who has only LO and HI. The number will flash red when a bomb is available.
- LUNA gauge. LUNA determines your main shot's rate of fire. Has 3 levels, LO/MI/HI. Text will flash blue when HI, indicating maximum fire rate.
- Subweapon gauge. Indicates the status of your subweapon. The bar indicates subweapon charge, while the rectangles indicate the level of attack available. For option type subweapons, MOUNT indicates the weapon is mounted to your character while INDEPEND indicates that it has been launched.
- STELLA gauge. Also called rank. Levels go from 1 to 9 to A. The number will flash red when the gauge is filling and blue when it is emptying.
- Target name. Indicates the name of the last target hit. Can be ignored.
- TERRA gauge. After being depleted, you will detour to a bonus segment called Shrine of Farewell after the end of the current segment.
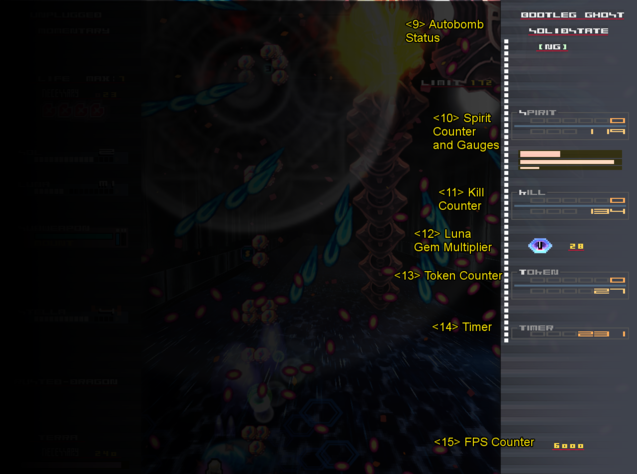
The righthand side of the HUD is mostly reserved for scoring info. Players playing for survival may ignore most of this.
- Autobomb status. If an autobomb is available, it will say so here and state how many you have remaining for the current segment. Otherwise it will tell you why an autobomb is not available.
- Spirit counter and gauges. The top counter represents Spirits earned from all previous segments and the bottom shows the amount earned on the current segment. These numbers are summed at the end of the segment. The gauges represent decimal values of Spirit gains. A full gauge from top to bottom represents 1, 10, and 100 Spirits. This allows players to easily track Spirit changes of any size, no matter how large their score becomes. If a Spirit BREAKTHROUGH is achieved, the word BREAK will appear next to the word Spirit.
- Kill counter. This tracks the total number of kills made in a run. Like the Spirit counter, the top number tracks previous segments and the bottom number tracks the current segment. BREAK will also appear next to Kills for a Kill BREAKTHROUGH.
- LUNA gem. The value inside the gem tracks the current LUNA crystal level, which determines their Token value. The number outside tracks how many more crystals need to be collected or lost to change the level.
- Token counter. Works similarly to the other two scores aside from lacking a BREAKTHROUGH.
- Timer. Counts the time (in seconds) since the start of the current segment.
- FPS counter. Tracks your FPS, to 2 decimal places (ie 6000 is 60.00). At one time it was possible to configure this to also show VRAM usage and Object Count. It is unknown if this is still possible.
Bootleg Ghost
The Bootleg Ghost setting determines autobomb behavior. Autobombs can trigged up to three times per segment.
- Aspirant: Autobombs will only activate if the SOL gauge is 5 and the player has less than 4 lives.
- Solidstate: Autobombs will activate any time Discharge is available.
- Adept: Disables autobombs entirely. Additionally:
- Changes the activation of the Suppression Radius, which now only activates when the main shot button is held, and activates faster.
- Changes the graze range behavior for most characters. Details in the strategy subpage.
Suppression Radius
All characters have a Suppression Radius which is activated by not firing the main shot for 60 frames, or by holding the shot button for 20 frames in ADEPT. The Suppression Radius takes the form of a light blue circle around the character. It slows down many types of bullets and, for a smaller number of them, will eventually destroy them entirely. Blocking bullets with your Suppression Radius causes rank to fall, and destroying them produces small LUNA chaff items which will more than recover the lost rank if collected.
Fossilmaiden's suppression aura works differently as it is only active while her subweapon button is held down. It is much smaller and less effective than the other characters', and does not change with Bootleg Ghost setting.
Collision
In a departure from the genre, colliding into walls or enemies in Hellsinker. does not kill you. Instead, you will be knocked back a certain distance away from the object collided with. If you are in a position to get knocked back several times (for example, wedged between two objects) your movement can become quite erratic. This encourages aggressive gameplay, as making a mistake and getting too close won't kill you (unless you get knocked back into a bullet). Additionally, any time the player character is invulnerable, they are also immune to knockbacks.
Many small enemies, parts etc. do not have any collision at all and can be moved into safely. Some enemies will still cause death on collision; technically, this is accomplished by such enemies having invisible bullets constantly inside them.
Sealing Enemies
When you approach certain enemies, a box featuring the word SEAL will appear on them. Enemies sealed in this manner cannot fire as long as you remain close to them as well as for a few moments after you move away. This also encourages aggressive play rather than waiting for enemies to fly down to you. The sealing radius is the same for all eligible targets and can be visualized by enabling "Emphasize:Seal Zone" under Info Augmentation before starting the game. (note: the visualization does not function during the tutorial)
Characters / Executors
Hellsinker. features four playable Executor characters, each with vastly different playstyles. Three of the characters are available by default, while the fourth, Kagura, is unlocked by clearing Segment 4 on a single credit.
- Deadliar: A mysterious veteran of GRAVEYARD who has a history with Cardinal. He focuses on strong but narrow attacks while his subweapon, the Mistletoe Tobari-Maru, can be freely placed to attack enemies with a small area-of-effect. His load-out option allows him to change the movement behavior of this subweapon. Relies on his huge, high-power discharge for mass destruction, which can be manually delayed while still providing invincibility.
- Fossilmaiden: A particularly sickly member of GRAVEYARD who uses her Mistletoe, Saraba-Maru, to see as well as fight. Has a wide variety of specialized attacks, mostly focused on covering extremely large areas of the screen with Saraba-Maru, who fires on all enemies who enter her radius. Two discharges; a powerful bomb that flies up the screen, and an invincibility cloak with no offensive component.
- Minogame: A hermaphroditic artificial sokushinbutsu confiscated by GRAVEYARD. Powerful enough to fight without a Mistletoe or equipment. They focus on strong area-of-effect attacks, invincibility, and auras, allowing them to survive especially dangerous situations. Discharge is a more genre-typical all-range, long-duration, high-commitment attack.
- Kagura/Kagura-Maru: A Mistletoe used as a living weapons platform after being crippled by feedback from Minogame. She has 4 distinct load-outs to use in combat; while very varied, these are generally more "familiar" to other shmups than the other Executors, sharing a greater emphasis on the main shot weapon and less (ab)use of invulnerability.
- Moon Cradle (Multi-Trajectory Shell): All-rounder whose every weapon features some kind of lingering hurtbox. Has two manually aimable subweapons, and weak discharges that only cost 2 SOL rather than emptying the gauge. Resembles ESP Ra.De.
- Ecliptic Chariot (External Gunner): Wields an external, three-pronged turret that can be launched and retrieved freely. Resembles Dragon Blaze.
- Infernal Sabbath (Variable Gun): High power main shot and no distinct subweapon; instead, the subweapon button controls the spread of the main shot. Discharge is a traditional circular "nuke" bomb. The only shot type with no way to attack backwards. Resembles the shot weapon from V-V.
- Xanthez (Anti-Bacillus Saber): Experimental type with extremely high destruction potential limited by conditional gimmicks. Powerful, auto-aiming main shot that requires periodic reloading. Short-ranged blade weapons deal more damage with each physics object collided with; this includes some enemy bullet types, potentially stacking up to massive counterattacks. Has the most damaging and least defensive discharge attack, a narrow laser beam.
Resources
Lives
The player starts with four lives. The Way of Life setting can change the maximum life cap to 6 (MODERATELY), 7 (PRUDENTLY), or 5 (DRASTIC). Reducing the life cap gives the player the opportunity to earn one or two extra Immortality bonuses at the cost of safety. Please note that the game ends when you are hit with only one life icon left, not when you have zero; as such, it is better to think of your life icons as "hit points" rather than "spare lives" or "shields".
Extend progress is displayed by the NECESSARY counter, with an Extend being earned when NECESSARY falls below 0.
| Item / Trigger | Effect on NECESSARY |
|---|---|
| Life chip | -1 |
| Ingot | -0.05 |
| LUNA crystal | -0.004 |
| Every frame prior to boss warning | -0.0008 |
| Starting a new Segment | -4 |
| Losing a life | -2 |
| Losing a life after a recent death | Additional -2 |
| Every frame REGEN ASSIST is active | -0.0064? |
| Blue crystallized spirit sh. | -0.5 |
| Red crystallized spirit sh. | -2 |
sh. Shrine of Farewell exclusive items.
How quickly individual Executors gain Extends is determined by their Life Scale and Expand attributes. Life Scale is the base value of NECESSARY. Every time an Extend is earned, the base value increases by the Expand value. Characters with high Expand values will find their Extends becoming comparatively rare in the late game. The base value of NECESSARY is reset to the starting Life Scale value when either type of BREAKTHROUGH is achieved.
| Executor | Life Scale | Expand |
|---|---|---|
| Deadliar | 20 | +2 |
| Fossilmaiden | 18 | +3 |
| Minogame | 23 | +1 |
| Kagura (Moon Cradle) | 22 | +1 |
| Kagura (Ecliptic Chariot) | 19 | +2 |
| Kagura (Infernal Sabbath) | 28 | 0 |
| Kagura (Xanthez) | 16 | +3 |
SOL and LUNA
Discharges and main shot power are governed by the SOL gauge. SOL is measured in levels 1 to 5, except for Fossilmaiden, who only has HI and LO levels. A minimum of 3 SOL (or HI) is required to use a discharge, with higher levels producing a more powerful and longer-lasting bomb. For all shots except Moon Cradle, performing a discharge sets SOL to level 1. For Moon Cradle, discharge lowers SOL by 2 levels; in this case the offensive component of the discharge does not change with SOL level, but the invincibility time still varies. The SOL gauge refills over time, or by gathering SOL pieces.
The LUNA gauge affects the rate of fire of your main shot. It is drained by firing your main shot, and recovers when not firing it. Different characters have different rates of LUNA efficiency on their shots, with alternate shot modes such as NARROW PIERCING or OVER FIRING draining LUNA at further different rates. Kagura can sustain her LUNA while shooting by pointblanking (in the case of Moon Cradle, almost indefinitely). The lower SOL is, the faster the LUNA refill rate. LUNA can also be refilled by collecting the various LUNA-related items.
Subweapon Gauge
The subweapon gauge determines the power (and in some cases, the type of attack) of your subweapon. It has 2 levels, is expended when you fire your subweapon, and fills when you are not using your subweapon. How the gauge behaves is character-dependent:
| Executor | Subweapon behavior |
|---|---|
| Deadliar | Firing main shot gradually depletes it from level 2 to level 1 |
| Fossilmaiden | Fills from level 1 to level 2 while subweapon button is held (may be purely visual?) |
| Minogame | Firing main shot gradually depletes it from level 2 to level 1 |
| Kagura (Moon Cradle) | Unaffected by shot, will always charge to level 2 |
| Kagura (Ecliptic Chariot) | Instantly sets to level 1 when firing main shot, charges to level 2 very slowly |
| Kagura (Infernal Sabbath) | Doesn't use it |
| Kagura (Xanthez) | Instantly sets to level 1 when firing main shot |
Items
Hellsinker. features 14 items (called Relics) that govern score and gameplay.
| Item | Description |
|---|---|
| SOL piece
|
Slightly increases SOL. Dropped by many enemies, often en mass. Trajectory is slightly magnetized to the player. |
| LUNA crystal
|
Primary Token scoring item. Flies upwards instead of falling down. Dropped by most enemies. Will increase in level if collected consecutively, and fall in level if lost consecutively. Fills LUNA somewhat and contributes marginally to Extend progress (1/250 NECESSARY). Can be collected in a small radius if the main shot button is not being held down. |
| LUNA droplet
|
Secondary Token scoring item. Generated when a target is destroyed with enemy bullets nearby to it (range based on enemy hitbox size). Will not cause the gem level to degrade if lost. 1/8th as effective as a crystal at LUNA recovery. |
| Frozen crystal
|
Bonus Token scoring item. Generated from bullet cancels after killing specific enemies. Automatically collected. High Token value. |
| LUNA chaff
|
Generated when destroying bullets with the Suppression Radius. Refills LUNA by a small amount and increases STELLA. No Token value. |
| Life chip
|
Contributes to Extend progress, worth 1 NECESSARY. Dropped by specific enemies. Lowers TERRA by 1 if lost. Trajectory is slightly magnetized to the player. |
| Ingot
|
Spirit scoring item. Generated from some bullet cancels, typically after killing a boss. Worth 0.2 Spirits and 0.2 NECESSARY. |
| Crystallized Spirits
|
Spirit scoring item. Appear at the end of the Shrine of Farewell dependent on player performance. Either type is worth 0.5% of total Spirits earned before entering the Shrine. Blue crystals are worth 0.5 NECESSARY and red crystals 2 NECESSARY. Magnetized to a spot below the player with a random offset?. |
| Young STELLA
|
Rank control item. Raises STELLA level by 1 immediately, and then further over time. Appear in fixed places. Can appear in groups when fulfilling stage-specific conditions. |
| Old STELLA
|
Rank control item. Lowers STELLA over time. Appear in fixed places, or when activating SELF ECLIPSE by continuously stalling bullets with the Suppression Radius. |
| Comet
|
Rank recovery item. On player death, 1 is dropped per STELLA level lost. Increases STELLA by 0.75 levels. |
| Reliquia
|
Raises TERRA by a small amount and has a medium Token value. Moves very quickly but is significantly magnetized to the player. Uncommon, dropped by specific enemies. |
| Revive
|
Instantly grants an extra life if the player is below max lives. Does not grant an Immortality bonus or affect the Extend count. Lowers TERRA by 25 if lost. |
Continues
Hellsinker. has only one continue and this cannot be changed. Furthermore, entering a special segment will disable your continue for the rest of the run. If you do manage to use your continue, several segments are also skipped in your playthrough (Segments 3L and 6 are known) and you are locked out of fighting the Segment 8 boss, precluding a good end. Additionally, segments played after a continue do NOT unlock in Segment Location (practice mode). Thus, you are highly encouraged to 1CC the game, or at least as far as you can manage.
TERRA
Of all the gauges in Hellsinker., TERRA is perhaps the most mysterious. The TERRA gauge starts any run at the full 240 points. TERRA is reduced when you make mistakes, let life chips fall off the screen, or finish segments. However, increasing TERRA is much harder. This means TERRA is constantly falling during normal gameplay. When TERRA does finally hit 0, a special segment called Shrine of Farewell is set as the next segment. Once you visit Shrine of Farewell, the TERRA gauge is disabled as it no longer has any effect on gameplay. Shrine of Farewell is mandatory in a Full Sequence Order playthrough but its position in the playthrough can be changed with TERRA management. With optimal TERRA management in Full Sequence Order, Shrine of Farewell will take place after Segment 7.
The following events decrease TERRA:
- Dying or autobombing
- Finishing stages with the amount varying based on the stage. Notably, Segment 7 essentially has -240 TERRA if played in Full Sequence Order.
- Letting Life Chips fall off the screen costs 1 TERRA per chip.
And the following actions increase TERRA:
- TERRA tokens which are rarely dropped from very specific enemies
- Extending gives you a small amount of TERRA
- Fate control: Putting the Segment 5 boss in a special state at the end of the fight will allow you to constantly raise your TERRA every time the boss dies and revives itself.
Avoiding hits and using fate control are the main ways to manipulate TERRA to enter Shrine of Farewell at a chosen moment.
Shrine of Farewell Mechanics
When you eventually visit Shrine of Farewell, you will notice several mechanics behave differently from the rest of the game. Shrine starts as a room with no enemies but several doors showing the same 4 symbols in different orders. Shrine is a boss rush with a strict time limit and these doors set the order you fight those bosses in. Touching a door will set that door as your order, and pressing Main Shot will open the door and start the rush. it may be worth it to time out this first room for score. Your Spirit very slowly rises while inside this room, so waiting 30 seconds can net you a handful. This is a very tiny amount in the grand scheme of things but all it costs is some patience.
Once you have selected your boss order and entered Shrine proper, the full force of the gameplay changes come into effect:
- Your Spirit drops to 0, however doing well in Shrine will reward your lost Spirit back, with even better gameplay actually increasing your Spirit greatly.
- You have infinite lives. The place where your lives sit in the HUD will instead say UNCHAINED for the duration of Shrine.
- Bootleg Ghost does not function inside Shrine.
- You cannot earn credit to your next Extend until the score screen of Shrine. This means ingots are worth only Spirit and Life Chips do not drop inside Shrine.
- Your STELLA constantly rises while inside Shrine.
- Your continue is disabled upon entering Shrine. Notably, Shrine is still mandatory even if you have already used your continue.
Each of the 4 bosses in Shrine of Farewell has 3 different attacks, and these attacks form the basis of scoring inside Shrine. Defeat an attack without dying, and you will earn Crystals (a Shrine only item) that are each worth 1/200th of your pre-Shrine Spirit total meaning 200 Crystals will get you your score back. The max amount of Crystals awarded in shrine is 424, meaning perfect gameplay will more than double your score. Additionally, once you reach the end of Shrine, Crystals will rain from the top of the screen. These crystals act as Life Chips meaning a player can earn several extends to get back in the run, or several Immortality bonuses to drive the score even higher. The following actions affect Crystal gain in Shrine:
- Dying to a boss attack will reduce Crystal earned for that attack. The amount is dependent on the attack in question, and several deaths will set this score to 0.
- Bombing the Kaname Stones that hold the bosses inside them instantly sets their Crystal score from 18 to 0.
- Timing out a boss will cause them to instantly leave, voiding any Crystals from attacks you had not yet defeated.
- Seeing a secret 5th boss in Shrine will add a large amount of Crystal. This secret boss is unlocked by defeating all 4 previous bosses under a par time (indicated by the Kaname Stones wailing) and you are not penalized for dying or bombing once it appears on screen. This secret unnamed boss cannot be damaged, has a health bar that constantly drains until Shrine ends, and summons many Scary Stupa enemies to shoot down for a ton of Kills.
Shrine represents a unique opportunity for players of all skill levels. Players playing for survival mostly do not care where it ends up in the rotation but it will naturally happen after several deaths, potentially saving players from a Game Over. Experienced players will appreciate the potential to double your score inside Shrine and therefore choose to delay it as long as possible. Doing this maximizes the score gained and is an integral part of scoring.
Rank
Rank in Hellsinker. is governed by the STELLA gauge. High STELLA will spawn extra waves of enemies and adjusts the Spirit value of all enemies upward, making it vital for score. Conversely, STELLA has little to no effect on bosses, with a few notable exceptions. The beginning of a run always sets the STELLA gauge to 1 (adjustable for practice mode only in the options) and a proportion of your ending STELLA is carried forward to the next stage.
Outside of this system, the following actions ***increase*** the STELLA gauge:
- Destroying enemies and subparts.
- Picking up green STELLA items, TERRA tokens, and Comet relics.
- Fine play, which includes staying alive for a long time and grazing many bullets and lasers.
- Surviving for at least 30 seconds after a death.
- Playing aggressively by staying at the top of the screen and point-blanking enemies.
- Shooting indestructible parts of enemies.
And the following actions ***decrease*** the STELLA gauge:
- Dying, compounded greatly by dying twice within 30 seconds.
- Autobombing
- Using discharge attacks, by an amount based on the number of bullets erased.
- Picking up pink STELLA items
- Grazing a certain numbers of bullets over time will always drop 2 pink STELLA items from the top of the screen. The number needed is indicated under the character and labelled "Appeasement". This is only visible while currently grazing.
- Spending long periods of time at the bottom of the screen.
Scoring
Hellsinker. features 3 different scores: Spirit, Kills, and Tokens and as a result 3 different ways to score. Spirit is the closest to a general score. Aside from destroying enemies, spirit can be raised by destroying subparts, destroying many destructible bullets at once, grazing many needle bullets at once, and unchaining special Master enemies which are tethered to slave enemies. Kills are simply a track of enemies killed. However, undestroyed subparts that die along with the main enemy, and slave enemies that self destruct during an Unchain do not count. Tokens measures how many LUNA Crystals you have picked up during play.
Spirits
Inner Spirit Raising and Spirit Pooling (tick points)
Inner Spirit Raising is a mechanic comparable to tick points — prominent to scoring games such as Battle Garegga — with the difference that instead of awarding points directly, it incrementally raises the kill value of the affected targets. Spirit Pooling is a parallel, more traditional continuous tick points mechanic, which is based on the same principles as Spirit Raising.
In order to use either system effectively, it's fundamental to find an appropriate hit rate/damage ratio. One tool for this is the shot aura. When a main shot weapon is fired, an aura is generated around the player character which delivers many hits while dealing almost no damage. The closer the target is to the player, the denser the hits become. The following table lists the number of hits per second applied by the shot aura at very close range, excluding all other weapons.
| Executor | Aura hits/sec |
|---|---|
| Deadliar | 420 |
| Minogame | 380 |
| Fossilmaiden | 60 |
| Kagura (Moon Cradle) | 210 |
| Kagura (Ecliptic Chariot) | 30 |
| Kagura (Infernal Sabbath) | 300 |
| Kagura (Xanthez) | 270 |
Supplementing shot aura with other weapons leads to wildly diverging results. For example, Deadliar's main shot itself does not contribute a useful number of extra hits, whereas Minogame's more than doubles the total hit rate. Therefore for Spirit Raising purposes it's usually more productive for Deadliar to point his main shot away from the target, while Minogame has more reason to consider pointblanking underneath a target. Characters with inefficient auras need to focus on other rapid-hitting tools, e.g. Fossilmaiden's orange blade subweapon.
In order to raise the value of fragile zako, it's necessary to use the weakest attacks to avoid killing them too fast; for targets with invulnerable or regenerating parts where damage isn't a limitation, going all out to maximize overall hits is the clear line of play. Hitting multiple targets simultaneously will enhance the efficiency for all of them, and hits landed on non-essential parts of enemies often contribute to the value of the core too. Many enemies are heavily damage resistant when first entering play, which is a prime opportunity to get lots of free hits in. As the Inner Spirit value of a target is raised, it becomes increasingly difficult to raise further.
Spirit Pooling functions on similar logic to Spirit Raising, predominantly based on hit count, but its income rate scales exponentially with additional targets, and it suffers no falloff. The number of pooled Spirits further scales by 1/24th of the total number of SLAVEs that have been UNCHAINED (for example, 1200 total UNCHAINed = +50 = 150% tick point income). The number of effective hits is stored in a buffer which is emptied every 3 frames when the awarded Spirits are calculated. This implementation results in a bug where pooling more than 21.4 Spirits in a single interval will overflow the range and wrap around, awarding a negative value instead. This bug is mostly a concern for Moon Cradle who is vulnerable to it throughout Full Sequence Order runs. A detailed breakdown of Spirit Pooling mechanics can be found in this post.
Breakthrough
At certain Spirit and Kill amounts, the character will earn a Breakthrough. Breakthrough not only adds a life but resets the number of life chips needed for an Extend, which makes future immortal bonuses easier to obtain. Breakthrough can only be triggered once each for Spirit and Kills, and the number needed is dependent on which one is triggered first. Spirit Breakthrough happens at 5200 Spirit if the Kill Breakthrough is untriggered, or 6200 otherwise. Likewise, Kill Breakthrough occurs at 2500 or 5000 kills.
Immortality
If a player earns a life while already at the life cap, they instead earn an Immortality bonus, increasing their Spirit. Immortality bonus starts at 80 Spirit and increases by 40 for each subsequent bonus. Immortality bonuses earned through a Breakthrough are instead worth 200 spirit.
Strategy
Please see Hellsinker/Strategy for more info.
Unlocks
Hellsinker. contains many hidden features that must be unlocked by making progress in the game such as extra game modes, new title screens, and goodies like a cutscene viewer and music room.
Unlocked by clearing Segment 4 1CC:
- Title Screen 2.
- Kagura, a fourth playable character.
- Segment Location, a practice mode. In order for a segment to be unlocked in practice mode, you must reach (but not necessarily defeat) a segment's boss 1CC.
- Segments 1 through 3 Lead. These Lead segments are harder than the default versions (now called Behind) but offer greater scoring opportunities as a result. They can be freely picked in Full Sequence Order.
Unlocked by clearing Segment 7 (1CC not necessary):
- Title Screen 3.
- Short Mission, an abbreviated run of the game. Short Mission is truncated to 5 segments instead of 8 and allows players to pick them from a series of groupings. Progress made in Short Mission counts for the purposes of unlocks such as Segment Location or beating the game.
Unlocked by defeating the 3rd True Last Boss (TLB-3), Lost Property 771:
- Extra Segment 1, The Great Majority. Extra segments are selected from the title screen and take place after the events of Full Sequence Order in order to expand on the story. The Great Majority is a score attack based segment.
Unlocked by clearing The Great Majority:
- Extra Segment 2, The Way of All Flesh. The Way of All Flesh is a survival based segment and features the return of Lost Property 771 in a new form.
Unlocked by clearing The Way of All Flesh:
- Title Screen 4. Additionally, title screens can now be freely changed in options.
- Strategy Recorder, a cutscene viewer. Strategy Recorder features extra cutscenes not seen during gameplay.
Unlocked by viewing all cutscenes in Strategy Recorder, then closing the game:
- Sound Memoir, a music room. A final cutscene will play when you close the game, thanking you for your efforts. Congratulations!
References & Contributors
- Primary info contributed by Yukkuritime
- Additional page formatting by CHA-STG
- "English strategy guide for HellSinker.", by Zaarock | https://shmups.system11.org/viewtopic.php?f=5&t=53078
- Spirit Scoring Strategies added by Twilightex and Legless
