Difference between revisions of "Hellsinker/Segments"
Jump to navigation
Jump to search
User account (talk | contribs) |
User account (talk | contribs) |
||
| Line 235: | Line 235: | ||
* TBA | * TBA | ||
=== Boss: Apostles of the Seed (Dawn & Dusk) === | === Boss: Apostles of the Seed (Dawn & Dusk) === | ||
| − | * | + | * Dawn is the red one and Dusk is the blue one. The percentage in the middle of the screen is their combined health. |
| − | + | * A pink or purple circle around an Apostle indicates that it has damage resistance. You can avoid using resources on them during this time or use the increased resistance to control their HP more effectively. | |
| − | * | + | * '''Phase 1:''' |
| − | * '''Phase 1:''' | + | ** The fight begins with a wave cannon attack as the bosses swoop in from below. |
| − | * | + | ** The Apostles shift up and down, firing either fixed bullets or homing fireballs. |
| − | * ''' | + | *** Positioning above an Apostle's head will SEAL all of its attacks during this phase. |
| − | + | *** Spirits players will want to use this phase to raise the Apostles' Spirit values as there aren't many other opportunities. | |
| − | ** | + | * '''All limb parts destroyed or combined health total under 70%:''' |
| − | * | + | ** Phase 2. The Apostles will take turns trying to overwhelm you with fast attacks. Each Apostle uses 1 of 4 unique attacks here, chosen randomly. |
| − | * | + | <tabber> |
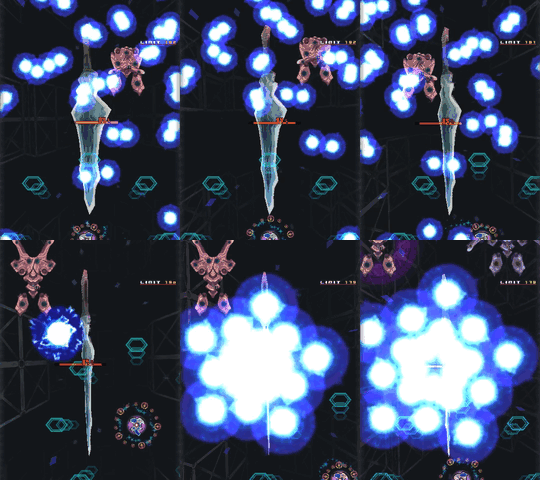
| − | ** | + | Dawn/Balls= |
| − | + | [[File:Hs-dawn-electro.gif|center]] | |
| − | ** | + | * Electro-balls are fired in pairs chaotically, then followed by a spread bomb. |
| − | * | + | * After being on screen for a certain time, the balls expand before dissipating. Don't get too close when stalling them with the Suppression Radius. |
| − | * | + | |-| |
| − | * | + | Dawn/Rush= |
| − | * | + | [[File:Hs-dawn-rush.gif|center]] |
| − | * ''' | + | * Chases the player with a circular melee attack while creating lines of bullets. Attacks 3 times. |
| − | + | * The range of the melee attack is smaller than it appears. | |
| − | * The Apostles | + | * It's often best to misdirect Dawn to the top of the screen on the second attack so not to get trapped at the bottom on the third. |
| − | + | |-| | |
| − | * Aside from the | + | Dawn/Homing= |
| − | ** The | + | [[File:Hs-dawn-homing.gif|center]] |
| − | * | + | * Launches homing fireballs. Fireball quantity changes with STELLA level. |
| − | * This phase | + | * Can be evaded simply by moving to one side of the screen and then in the other direction. |
| − | * ''' | + | * Can be SEALed completely if you happen to be close to Dawn at the time. |
| − | * | + | |-| |
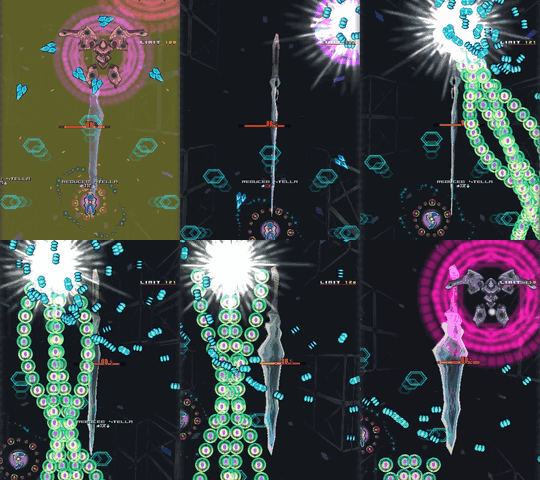
| − | + | Dawn/Stream= | |
| − | * | + | [[File:Hs-dawn-stream.gif|center]] |
| − | * During this phase, the Apostle | + | * Goes to one edge and fires a big fixed stream plus many mini-walls of small bullets while moving to the other edge. |
| − | * ''' | + | * Easily avoided by hugging the opposite edge. |
| − | * | + | * Activating the Suppression Radius pre-emptively to clear a gap is often a smart play. If not, be cautious of being attacked by Dusk while navigating the lingering small bullets. |
| − | ** Be cautious of being clipped by | + | |-| |
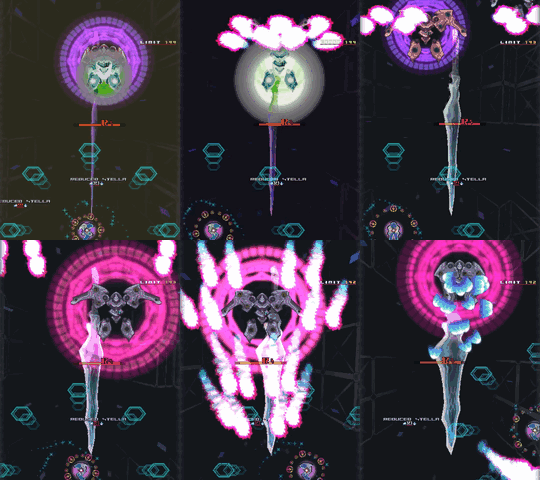
| − | * | + | Dusk/Blade= |
| − | + | [[File:Hs-dusk-blade.gif|center]] | |
| − | * | + | * Quickly lines up with the player and fires a giant beam and 5 wedges. Attacks 4 times. |
| − | * | + | * Fast and dangerous attack. Can easily snipe you if you're not anticipating it. |
| − | * | + | |-| |
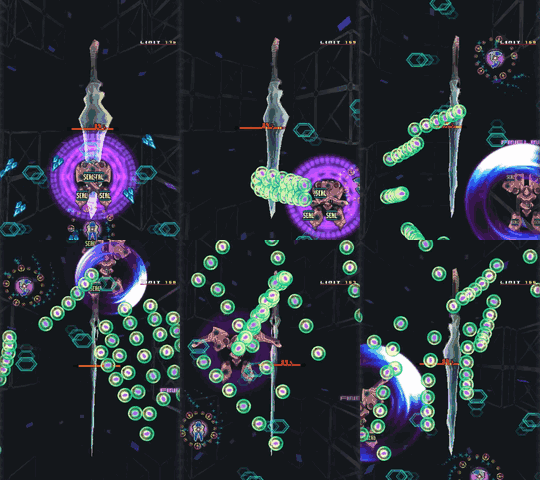
| − | * | + | Dusk/Plasma= |
| − | + | [[File:Hs-dusk-plasma.gif|center]] | |
| − | + | * Fires loads of small wedges everywhere and creates transitory walls of purple chains. | |
| + | * The chains' sequence is fixed. Despite appearances, the area underneath Dusk is safe from them. | ||
| + | * It's inadvisable to use the Suppression Radius here as neither of the bullet types can be destroyed and there's not much space to work with. | ||
| + | |||
| + | |-| | ||
| + | Dusk/Spread= | ||
| + | [[File:Hs-dusk-spread.gif|center]] | ||
| + | * Random bullet spam ending with an aimed 3-way stream. | ||
| + | * The bullet speed gets faster over time. | ||
| + | |||
| + | |-| | ||
| + | Dusk/Walls= | ||
| + | [[File:Hs-dusk-walls.gif|center]] | ||
| + | * Sequence of plasma walls from the left and right edges. | ||
| + | * The walls block projectiles. | ||
| + | * Has a safespot at the top, between Dusk's raised arms. This also provides an opportunity to raise Dusk's Spirit value a little. Use a Discharge to noclip up there. | ||
| + | </tabber> | ||
| + | :* The general character of this phase is that the weaker attacks create interference so you get trapped or sniped by a follow-up. Strategize around the killer combinations wherever they could happen. | ||
| + | :** For example, assume Dusk is going to do Blade after '''every''' Dawn attack and the frequency of mistakes will fall. | ||
| + | :* Control your damage output during this phase. Dusk should be brought to no lower than 33% to ensure the following phase triggers with Dawn at under 5%. | ||
| + | * '''Both Apostles alive, combined health total under 20%:''' | ||
| + | ** Team attack phase. The Apostles rotate around opposite sides of the screen while tethered together with a chain. They spin in one direction slowly, or spin in the opposite direction quickly, ordered randomly. | ||
| + | ** Aside from the chain itself being deadly, Dawn fires aimed bursts of destructible bullets, while Dusk summons bubble-shaped SURX enemies to bump into you. | ||
| + | ** The chain is grazable. Using shot during this phase should be avoided for Spirit purposes. | ||
| + | ** This phase will end early if an Apostle dies. | ||
| + | * '''Both Apostles alive, team attack phase timed out:''' | ||
| + | ** Self destruct phase. The Apostle with lower HP destroys its own limbs and performs a final desperation attack. | ||
| + | *** Dawn flies to the top and rain down rows of large bullets. This attack is completely harmless above it. | ||
| + | *** Dusk flies to the middle and fires clusters of exotic bullets in all directions. | ||
| + | ** During this phase, the Apostle has a supercharged version of their shield, blocking the vast majority of damage. Entering this phase with more than ~5-6% HP will make it very difficult to kill the Apostle before the 10 second timeout. | ||
| + | * '''One Apostle alive:''' | ||
| + | ** Solo phase. The surviving Apostle performs a final attack. | ||
| + | ** Dawn moves to the middle and fires a 4-way bullet spiral which spins at varying speeds. | ||
| + | *** The bullet density of this attack isn't very high. Dawn is rarely the surviving Apostle on Spirits runs. | ||
| + | ** Dusk attempts to wall you with a fixed + aimed pattern. If left alive long enough, it will switch to a static dive attack pointed directly downwards, then back to the first pattern. | ||
| + | *** Be cautious of being clipped by the aimed yellow droplets. Focus on avoiding them cleanly. | ||
| + | *** When aiming for an Ingot cancel, the pink parts of the pattern are densest. The 3-way pink swipe at the end of each cycle takes a while to leave the screen and will overlap with the upcoming cycle. | ||
| + | **** This can be fairly challenging to time correctly if all of your character's attacks require aiming. | ||
| + | **** It can also be possible get a big cancel off the dive attack. Optimizing this requires either good HP management due to the interfering boss shield, or a powerful Discharge for the star cancel trick. | ||
== Segment 7 == | == Segment 7 == | ||
Revision as of 18:40, 28 May 2024
Contents
- 1 Segment 1 Lead
- 2 Segment 1 Behind
- 3 Segment 2 Lead
- 4 Segment 2 Behind
- 5 Segment 3 Lead
- 6 Segment 3 Behind
- 7 Segment 4
- 8 Segment 5
- 8.1 Boss: Perpetual Calendar
- 8.1.1 Calendar Pattern 1: Ages Circulation
- 8.1.2 Aristofencer
- 8.1.3 Calendar Pattern 2: Solar Dust
- 8.1.4 Curiousmediator
- 8.1.5 Calendar Pattern 3: Inversal Current
- 8.1.6 Neverblossom
- 8.1.7 Saint Mauve
- 8.1.8 Calendar Pattern 4: Lunatic Phantom
- 8.1.9 Old Rose
- 8.1.10 Calendar Pattern 5: Astrolabium
- 8.1.11 Calendar Pattern 6: KAREIDOSCOPE
- 8.1 Boss: Perpetual Calendar
- 9 Segment 6
- 10 Segment 7
- 11 Segment 8
Segment 1 Lead
- TBA
Boss: Rex Cavalier (Aerial Form)
- The boss has two destructible hands, indestructible arm segments, and two wings that can be destroyed twice each. The first kill of each wing will remove its attached arm.
- Destroying the right CANNON-DEVICE first and then the left SWORD-DEVICE will cause the latter to drop LUNA Crystals and Ingots.
- The boss has "blue pattern" and "red pattern" modes. The core will flash white before it switches modes.
- Blue pattern:
- Fixed sparse spreads downwards
- Red pattern, player below boss:
- Aimed fast wide 5-ways in bursts of 2 or 3
- Red pattern, player above boss:
- Aimed fast narrow 5-ways in bursts of 2 or 3
- Blue pattern:
- Typical Spirit scoring strategy involves aggressively driving the Inner Spirit values up during the blue phase, and possibly macroing back and forth above the boss to get some value from the red phase.
- Depending on character, it may be possible to hit the arm segments at the same time as the vulnerable parts to increase value more efficiently.
- The wings do not attack until destroyed once.
- Wing destroyed once, blue pattern active, before dive attack, only once per wing:
- Missile barrage straight down, then mines which explode into aimed bullets
- Wing destroyed once, otherwise:
- Fixed lanes of bullets straight down
- Wing destroyed once, blue pattern active, before dive attack, only once per wing:
- After about 50 seconds, the boss performs a dive attack.
- 1000KNIGHTS zako may appear depending on the status of the boss, each of which will drop a Life Chip.
- Maximum of 8 if both hands are destroyed and neither wing is completely gone.
- Any arms that are still attached when the boss boosts backwards will spew out LUNA Crystals. Shortly afterwards, the wings self-destruct into their second form, removing the arms and forfeiting any Spirit value.
- These extra crystals aren't very useful when Token scoring because triggering them takes too much waiting and it's much better to go for Freeze Cancels on the missiles anyway, which requires destroying the wings before the dive.
- 1000KNIGHTS zako may appear depending on the status of the boss, each of which will drop a Life Chip.
- All parts gone:
- The core bobs around erratically while emitting rings of blue destructible bullets, then fires dense streams of red destructible bullets straight down.
- The core switches between sniper 5-ways and quick aimed bursts, moving around periodically. Ingot cancel potential is minimal.
Segment 1 Behind
- SHELL BATTERY
- The only real Spirit attraction to this stage. The ring of invulnerable parts can create a lot of tick points if hit simultaneously (>2000 Spirits over the sequence in the best cases). Clipping inside the ring is possible by hugging the top of the screen where the battery enters or via invincibility. The Inner Spirit value of the core is continually reset to 0, so this trick is useless for characters who are bad at tick points.
Boss: Quiet Minstrel
- All of the boss's patterns are simple fixed + aimed attacks.
- Destroy the core twice first to increase the Spirit value of the noses.
- The boss begins moving around after destroying its core twice. Time this to ensure it moves in a consistent way and doesn't wall you.
- Core destroyed twice, all parts destroyed:
- Second form with four options. The back options fire straight down and the front pair fire aimed shots.
- Destroying the front options renders the boss effectively harmless, allowing its value to be raised trivially.
- All second form options destroyed:
- Third form with indestructible options firing entrapment lanes. Alternates with a sniper pattern after a while.
- Good bullet cancel potential, but inconsistent if not planned precisely.
- Timings where the boss is in its most upper-right position work well. The top-right option should be touching both edges of the play area.
Segment 2 Lead
- WATERLEAPER
- Destroying 12 or more total leg pieces will replace the enemy waves at TIMER 83 with two high-value large stones.
- SKULL-GUNNER
- These shoot 2x triplets of indestructible SOLID-AMMO up to 7 times each, which can be milked for lots of tick points with area damage over time weapons. Spread hits out between multiple lanes of torpedoes to increase the income rate.
Boss: Scarlet Queen
- Scarlet Queen has a multitude of parts to dismantle. Which parts she has remaining can dramatically change her attack patterns.
- Talons, two large parts at the bottom. Periodically swing in and out shooting flames and bullets.
- Wings, two large parts at the top sides. Move up and down. Do not have any attacks until the feathers are gone.
- Feathers, 5 on each wing. Fire various projectiles and can be SEALed.
- Thorned-Tiara, at the top middle. Shoots burst streams at the player if approached. Drops Life Chips when destroyed.
- The core alternates between wide/spase fans of small bullets and chaotic waves of thorn bullets. Both types are static.
- Both talons destroyed:
- The talon stumps fire walls of thorn bullets with brief gaps. The feathers fire grazable needles in static patterns.
- If playing for Spirits, leave all the feathers intact while destroying the talons to not miss out on needles.
- The second talon should be destroyed at roughly TIMER 159.5, between the second and third fan shot, for the optimal sequence.
- Moving too high up the screen during this pattern will SEAL some of the feathers and reduce the number of needles shot. Stay near the bottom.
- The needles can be thought of as having limited "ammo". If some fail to appear due to SEALing or low STELLA, they may be fired later once the conditions are met.
- Both talons destroyed, needles exhausted:
- The feathers fire aimed droplet bullets.
- All feathers destroyed, at least one wing alive:
- The wings fire homing missiles. These can be shot down to milk Kills or Tokens.
- Until both wings are gone, the core patterns change to tightly spaced fans and aimed thorn wedges.
- No parts remaining excluding tiara:
- All bullets cancel into SOL pieces and a pair of STELLA items appear.
- The core switches to much denser patterns. Take advantage of this for a good Ingot cancel.
- Boss destroyed, good survival performance:
- Spirit Kernel form. The boss's soul will attempt to destroy you with fast and dense patterns. This phase lasts 17 seconds and consists of 4 attacks performed in rapid succession.
- The Spirit Kernel will appear if the following is true:
SURVIVABILITY * 10 + (STELLA level - 1) * 32 - (discharge cancel score) > 1070
- "Discharge cancel score" increases when cancelling bullets with Discharge during the Segment. Its maximum is 150, which is not enough for an invalidation alone assuming that the other values are perfect. Realistically, it's unlikely to be higher than 30.
- Basically, don't die and end with high STELLA. Discharges will narrow the room for error if an error has been made.
- The boss releases a huge stream of LUNA Crystals during patterns 1-3. Even when not playing for Tokens, it's worth attempting to collect them for NECESSARY.
- The boss makes two sudden movements on the first pattern. These are random but are always at the same timings.
- Destroying the boss will cause another Ingot cancel and a Revive item to drop. As the boss's final pattern is the densest, it is worthwhile to delay killing it until the last second.
- Since dying lowers NECESSARY by 2 and the Revive does nothing when at the life cap, a suicide is often profitable long-term. The second wave of pattern 3 is a good spot to die.
Segment 2 Behind
- TBA
Boss: Glorious Symbol
- TBA
Segment 3 Lead
- If the SEAGULLs coming from the top are exhausted early, many needle-firing CHILDREN appear. The optimal way to trigger this is a clean UNCHAIN at TIMER 94.4. The player should be positioned to the MASTER's right ready to scroll more enemies onscreen ASAP.
Segment 3 Behind
- TBA
Boss: Sunken Bishop
- TBA
Segment 4
- SECTOR 02
- The SECTOR only advances when the 300-frame LIMIT timer has expired and no enemies are alive; when advanced, an Ingot cancel occurs. DUNLINs fire slow thorn bullets 120 frames after appearing. Try to spawn a new DUNLIN ring a little before LIMIT 120 and leave it intact to create more Ingots.
- SECTOR 03
- If STELLA is raised to level 7+ before reaching this SECTOR, two additional HONEYCOMBs will spawn.
- SECTOR 04
- Whichever side three RAVENs appear on will be the same side the MONO-WINGs appear on in SECTOR 05.
- SECTOR 10
- Going to the top middle of the screen after all enemies have been killed triggers an Ingot cancel. UNCHAIN the enemies so that a path to the top remains open.
Boss: Rusted Dragon
- Rusted Dragon is considered a step up in difficulty for first time players, as it is a lot more aggressive than the bosses from the Behind Segments. However, a lot of its difficulty can be mitigated through knowledge and practice.
- Before the fight even starts, if you have 2 lives of less Rusted Dragon will not appear at all, ending the stage early. This may save new players from a difficult fight if they are struggling with the start of the game.
- In the event you do fight Rusted Dragon, it starts the fight by quickly swooping in and firing mostly static walls of bullets.
- One note about this static phase is that fairly early in it, Rusted Dragon will fire large elliptical bullets from the left and right ends of the screen. Destroying these offers the largest NUTCRACK bonus in the game.
- Rusted Dragon's two wings can be attacked and destroyed, and have 2 health bars each. Emptying the first bar offsets the wing a bit, erases the boss's shots for several seconds (similar to a discharge), and makes its initial attack pattern more complicated.
- Destroying a wing a second time will fully remove it. If this is the first wing destroyed, it will fire an absurdly dense burst of red elliptical bullets that you can milk for a NUTCRACK bonus. If it's the second wing it will release some Clambons and move to the final phase of the fight.
- The faster the two wings are destroyed, the earlier you will reach the lucrative final attack in this phase.
- Rusted Dragon will release Clambons, and replace them with another set when they are destroyed. Clambons have varying attacks, dependent on their size and how many are in this particular wave. Each attack is fairly simple.
- Most of the Clambon formations are either fixed-position or manipulatable predictably with practice. An exception is the chaotic movement of the small Clambon swarms.
- Rusted Dragon itself will mostly attempt to track you vertically and release bullets straight down. Its movement pattern tries to alternate sides 4 times, then go to the middle, then repeat.
- Eventually, Rusted Dragon will start to release UNCHAINable Clambon trains from the top, and small Clambons from the bottom. The UNCHAIN target is the most valuable but make sure to kill the Clambons as quickly as possible.
- It's also important to keep Rusted Dragon's HP high if you are milking this boss, as it will take lots of incidental damage from stray shots.
- Rusted Dragon will begin its final attack after several sets of trains. it will stop moving and release dense random bursts of bullets. Very large Clambon trains will swoop in from the left and right.
- These trains have an UNCHAIN bonus of 19 which is a very high value. Milking this boss involves maximizing these train kills and their UNCHAIN bonus, only killing the boss at the last second.
- Kill trains on the side they spawn on. Once they pass into the opposite half of the screen, the lead Clambons on the train will start to move offscreen and reduce your UNCHAIN bonus.
- Rusted Dragon's attacks are mostly random and will need to be sight read to find safespots and paths to the other side of the screen.
- Staying near the middle of the stage will make this phase considerably easier to survive, but will cause a lot of accidental damage to the boss. Moving from side to side is more challenging but will preserve the boss's HP.
- Discharges that can be used without damaging the boss or the Clambons, such as Dead Liar at minimum SOL, Fossil Maiden's Bacillus Cloak, and Xanthez/Kagura4's beam, can be helpful for safety here.
- Make sure to kill Rusted Dragon at the last possible second. The bullets it fires become more dense as the time reaches 0 and killing Rusted Dragon will cause a bullet cancel. Missing this cancel will undo some of the work spent milking Clambons.
- If you happen to destroy Rusted Dragon without destroying either wing?, it will drop a Revive Token. However, this is not very useful.
Segment 5
- The Inner Spirit value of the GOLDEN-ARMs increases the closer the player is to them.
- If a Life Chip scrolls off the left or right screen edge due to the scrolling changing direction, it is lost immediately. Be careful when killing turrets out of your reach.
- Constantly attacking the walls (INCABLOCKs) is a source of tick points and helps raise STELLA.
Boss: Perpetual Calendar
- This fight is a boss rush alternating between Calendar patterns and 4 midbosses.
- The SOL side bosses are preferred for Spirits play, while the LUNA side bosses are preferred for Tokens or Kills play.
- Calendar patterns advance when all of the 24 turret parts are destroyed, or upon timeout (functionally ~18 seconds on all except the last).
- There are no additional penalties to timing out any part of the fight.
Calendar Pattern 1: Ages Circulation
- Very simple fixed + aimed bullets.
Aristofencer
- Midboss 1 on SOL side and midboss 4 on LUNA side.
- Structurally similar to the Segment 1L boss, with two hands, indestructible arms and two "shoulders" to be destroyed twice. Attempting to go above it will just result in death though.
- Switches to a rotating fan pattern once all parts are destroyed.
- There are two strategies to getting a bigger Ingot cancel from the fan.
- Wait for the boss to be at one edge of the screen and firing towards the opposite side to maximize the screen space for bullets. This works better for Deadliar and Fossilmaiden who can more easily collect dispersed items.
- Wait underneath the boss and stall the fan with the Suppression Radius as it turns towards you, finishing the boss off at the last moment. As the core is fragile, it's viable to kill it with a Discharge and utilize the star cancel trick.
- There are two strategies to getting a bigger Ingot cancel from the fan.
Calendar Pattern 2: Solar Dust
- Draws a harmless trace in straight lines which leaves a delayed fire trail.
- The logical sequence of lines is always the same, but the rotation/points aimed at depend on the stage TIMER.
- Small TIMER variations don't make much difference. Aim to reach this phase on a similar TIMER every run so it becomes consistently routeable.
- The passing fire dislodges archives from the backdrop which can be shot for Kills and LUNA Crystals.
Curiousmediator
- Midboss 2.
- Odd gimmick enemy. Additional parts are NOBLE-GUNNER (right arm), RUDE-GUNNER (left arm), and two indestructible joints.
- The arms can be destroyed repeatedly.
- The arms are initially indestructible and briefly become vulnerable after "punching". Attacking an arm's attached joint will drastically increase its damage resistance.?
- The core can be safely flown through.
- Pattern 1 is totally safe above the boss and predictable below it. This is the obvious choice for milking the arms or raising the core value.
- Pattern 2 starts at ~63% core health. This pattern is dangerous and is usually speedkilled.
- Pattern 3 starts at ~29% core health. The small rings are dense and produce a lot of Ingots when the boss is killed. The boss will only drop Life Chips if the player is above the core when it dies.
Calendar Pattern 3: Inversal Current
- Fixed pattern with a unique bullet type.
- The bullets have a limited lifespan and cannot be cancelled by any other means.
- The bullets dislodge lots of archives.
Neverblossom
- Midboss 3 on SOL side and midboss 1 on LUNA side.
- Has 8 shield parts surrounding the core.
- Pattern 1:
- Fires aimed bullets from the core.
- Performs telescopic punches with either the cardinal or diagonal set of parts, and fires 5-way bursts with the other set.
- The punches can come out very suddenly at high STELLA.
- The cardinal set always punches first.
- Pattern 2:
- Fires aimed bullets from the core.
- Spins around rapidly launching random bullet walls from the parts. Ends with a 16-way blossom of extremely slow drifting bullets.
- After the first cycle, the boss begins rotating and moving around during pattern 1.
- Core under ~45% health:
- The core moves to the middle and emits three needle lanes while rotating.
- Remaining parts either orbit the core closely and shoot outwards, or orbit far away and shoot inwards.
- A few hundred Spirits can be gained from grazing the second phase.
- All of the parts should be destroyed in the process of lowering the core's health so they don't interrupt you while grazing. Plan your attacks in order to raise the parts' value while doing this.
- It's advisable to speedkill the first phase in any case as the boss gets much more annoying after the first cycle.
Saint Mauve
- Midboss 3 on LUNA side.
- Has 5 patterns, advancing as her health depletes.
- Releases a flock of harmless bird zako after each pattern which can be destroyed for Kills or LUNA Droplets.
- Releases bird zako repeatedly during the final pattern Fragment: Purgatoric Shine.
- Rush to the final pattern to milk Kills and Tokens.
Calendar Pattern 4: Lunatic Phantom
- Similar to Solar Dust but draws one continuous bendy line in a confusing meandering pattern.
- Can be routed similarly to Solar Dust.
- Absent a route, staying as far away as possible from the boss and/or hiding in the corners can work.
- Big source of archives for extra Kills.
Old Rose
- Midboss 4 on SOL side.
- An unusually random enemy, with both random pattern selection and random movement. When below ~49% health and ~24% health, the selection of patterns changes.
- In addition to each pattern having its own name, the effects/aura flashes around Rose can be read to determine what she's about to do.
- Beware being attacked from the bottom of the screen after Dominator On The Twilight, or being rammed at the start of said pattern.
- At ~74% health and ~49% health:
- Deploys 10 stationary Mistletoes which fire aimed shots in the first case and rotate in the second.
- Mistletoes have damage resistance briefly after appearing. Take advantage of this to raise their Spirit value.
- The Mistletoes self-destruct if left alive for too long.
- Deploys 10 stationary Mistletoes which fire aimed shots in the first case and rotate in the second.
- At ~24% health:
- Deploys 20 Mistletoes in two concentric rings which shoot flames inwards. If left alive long enough, they perform a big aimed attack.
- Rose should be killed during Wish Slaughter to maximize the Ingot cancel.
- Get to the end of the fight with time to spare in case she trolls you by refusing to pick Wish Slaughter for multiple cycles.
- Be careful not to hit the item limit by producing too many Ingots, which will cause Rose's dropped Life Chips to not appear.
Calendar Pattern 5: Astrolabium
- Opens with a left winder, then 2x right, 2x left, 2x right etc.
- Fires beams from the 12 turrets.
- The LIMIT timer on this phase is influenced by how quickly you progress past the other bosses.
- Destroy the core and the boss ends immediately.
- Destroy all of the turrets and wait, and a second set of turrets will appear. Destroy the second set and wait, and the phase will switch to KAREIDOSCOPE.
Calendar Pattern 6: KAREIDOSCOPE
- Can't be ended early, continues until timeout. Shares the LIMIT timer with Astrolabium.
- Rotates through a series of patterns, each with many attached SLAVEs.
- Destroying the core advances the PHASE counter and switches to the next pattern.
- On the second pattern and every 4 thereafter, the boss will additionally start a delayed multiple beam attack.
- While it's usually possible to kill the core before the beams activate, intentionally letting them come out before a kill is a large source of Frozen Crystals.
- Each kill activates FATE CONTROL, recovering 3 TERRA.
- Both the UNCHAIN value of the SLAVEs and the difficulty of the patterns increase with PHASE.
Segment 6
- TBA
Boss: Apostles of the Seed (Dawn & Dusk)
- Dawn is the red one and Dusk is the blue one. The percentage in the middle of the screen is their combined health.
- A pink or purple circle around an Apostle indicates that it has damage resistance. You can avoid using resources on them during this time or use the increased resistance to control their HP more effectively.
- Phase 1:
- The fight begins with a wave cannon attack as the bosses swoop in from below.
- The Apostles shift up and down, firing either fixed bullets or homing fireballs.
- Positioning above an Apostle's head will SEAL all of its attacks during this phase.
- Spirits players will want to use this phase to raise the Apostles' Spirit values as there aren't many other opportunities.
- All limb parts destroyed or combined health total under 70%:
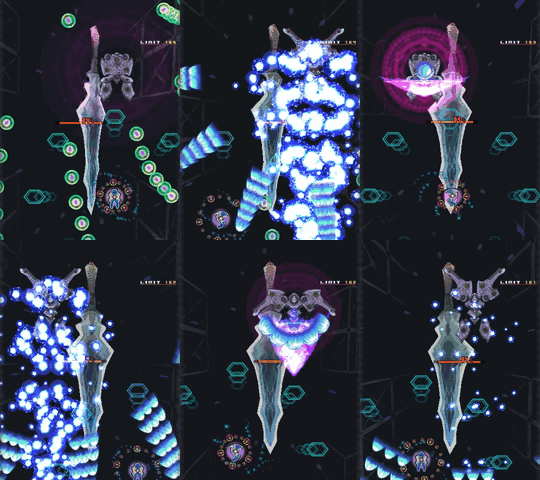
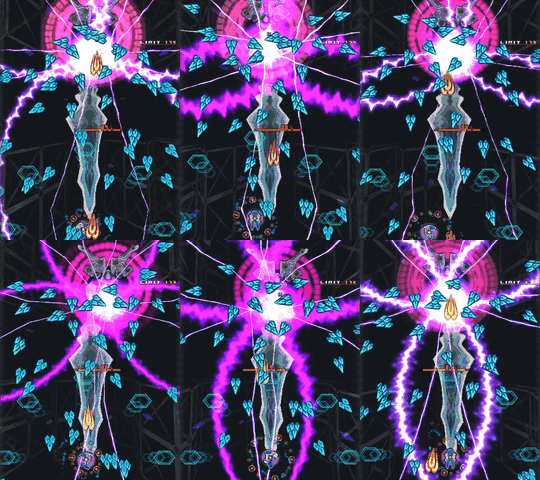
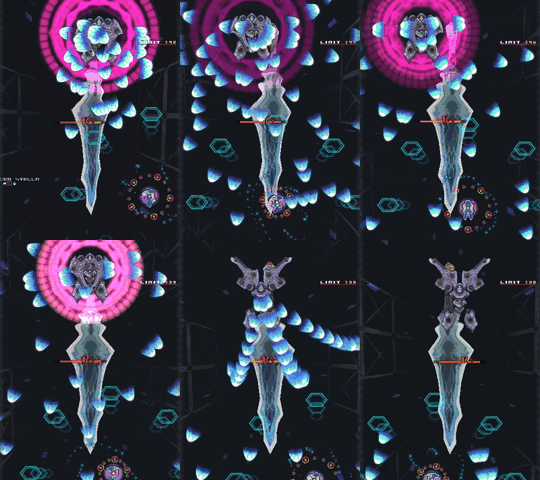
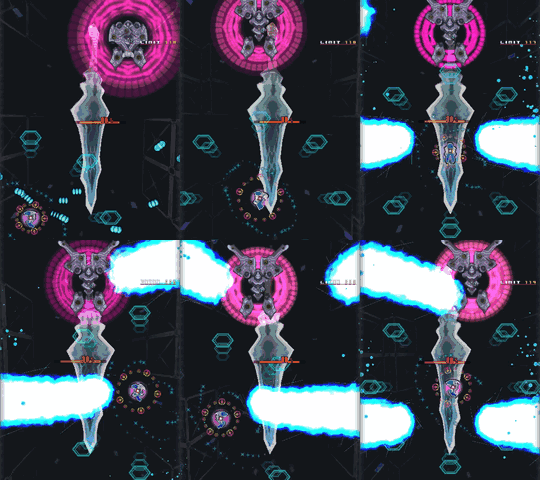
- Phase 2. The Apostles will take turns trying to overwhelm you with fast attacks. Each Apostle uses 1 of 4 unique attacks here, chosen randomly.
- Electro-balls are fired in pairs chaotically, then followed by a spread bomb.
- After being on screen for a certain time, the balls expand before dissipating. Don't get too close when stalling them with the Suppression Radius.
- Chases the player with a circular melee attack while creating lines of bullets. Attacks 3 times.
- The range of the melee attack is smaller than it appears.
- It's often best to misdirect Dawn to the top of the screen on the second attack so not to get trapped at the bottom on the third.
- Launches homing fireballs. Fireball quantity changes with STELLA level.
- Can be evaded simply by moving to one side of the screen and then in the other direction.
- Can be SEALed completely if you happen to be close to Dawn at the time.
- Goes to one edge and fires a big fixed stream plus many mini-walls of small bullets while moving to the other edge.
- Easily avoided by hugging the opposite edge.
- Activating the Suppression Radius pre-emptively to clear a gap is often a smart play. If not, be cautious of being attacked by Dusk while navigating the lingering small bullets.
- Quickly lines up with the player and fires a giant beam and 5 wedges. Attacks 4 times.
- Fast and dangerous attack. Can easily snipe you if you're not anticipating it.
- Fires loads of small wedges everywhere and creates transitory walls of purple chains.
- The chains' sequence is fixed. Despite appearances, the area underneath Dusk is safe from them.
- It's inadvisable to use the Suppression Radius here as neither of the bullet types can be destroyed and there's not much space to work with.
- The general character of this phase is that the weaker attacks create interference so you get trapped or sniped by a follow-up. Strategize around the killer combinations wherever they could happen.
- For example, assume Dusk is going to do Blade after every Dawn attack and the frequency of mistakes will fall.
- Control your damage output during this phase. Dusk should be brought to no lower than 33% to ensure the following phase triggers with Dawn at under 5%.
- The general character of this phase is that the weaker attacks create interference so you get trapped or sniped by a follow-up. Strategize around the killer combinations wherever they could happen.
- Both Apostles alive, combined health total under 20%:
- Team attack phase. The Apostles rotate around opposite sides of the screen while tethered together with a chain. They spin in one direction slowly, or spin in the opposite direction quickly, ordered randomly.
- Aside from the chain itself being deadly, Dawn fires aimed bursts of destructible bullets, while Dusk summons bubble-shaped SURX enemies to bump into you.
- The chain is grazable. Using shot during this phase should be avoided for Spirit purposes.
- This phase will end early if an Apostle dies.
- Both Apostles alive, team attack phase timed out:
- Self destruct phase. The Apostle with lower HP destroys its own limbs and performs a final desperation attack.
- Dawn flies to the top and rain down rows of large bullets. This attack is completely harmless above it.
- Dusk flies to the middle and fires clusters of exotic bullets in all directions.
- During this phase, the Apostle has a supercharged version of their shield, blocking the vast majority of damage. Entering this phase with more than ~5-6% HP will make it very difficult to kill the Apostle before the 10 second timeout.
- Self destruct phase. The Apostle with lower HP destroys its own limbs and performs a final desperation attack.
- One Apostle alive:
- Solo phase. The surviving Apostle performs a final attack.
- Dawn moves to the middle and fires a 4-way bullet spiral which spins at varying speeds.
- The bullet density of this attack isn't very high. Dawn is rarely the surviving Apostle on Spirits runs.
- Dusk attempts to wall you with a fixed + aimed pattern. If left alive long enough, it will switch to a static dive attack pointed directly downwards, then back to the first pattern.
- Be cautious of being clipped by the aimed yellow droplets. Focus on avoiding them cleanly.
- When aiming for an Ingot cancel, the pink parts of the pattern are densest. The 3-way pink swipe at the end of each cycle takes a while to leave the screen and will overlap with the upcoming cycle.
- This can be fairly challenging to time correctly if all of your character's attacks require aiming.
- It can also be possible get a big cancel off the dive attack. Optimizing this requires either good HP management due to the interfering boss shield, or a powerful Discharge for the star cancel trick.
Segment 7
- UNNAMED 499
- MASTER on left. The SLAVEs drop Life Chips when killed individually.
- UNNAMED 500
- MASTER on right. The SLAVEs fire needles, and drop Life Chips and fire revenge needles when UNCHAINed.
- 1000KNIGHTS
- Drop Life Chips if killed after performing an attack. Bait their swipes with vertical movement.
Boss: Rex Cavalier (Land Form)
- Staying above Rex Cavalier's head ("out of the conversation sphere") will dodge all attacks for the first chunk of the fight.
- Rex Cavalier's health will slowly regenerate over time. This continues until TIMER 130 where it regenerates in a burst, then stops.
- All of Rex Cavalier's parts regenerate when destroyed.
- In addition to the value of the parts, damaging or destroying the parts raises the Inner Spirit value of the core. This may be more or less score-efficient than raising its Inner Spirits through direct attacks depending on which EXECUTOR you're playing.
- Killing Rex Cavalier transforms it into an invincible secondary form (UNNAMED 394) which will attack in dense spinning patterns until the timer runs out.
- When the boss timer runs out, Rex Cavalier will switch to its final Spirit Kernel form. If it was in its secondary form, it will additionally drop a Revive Token.
- The base Spirit value of the Spirit Kernel is dependent on the value of the boss core when it was destroyed. If the Spirit Kernel phase is reached through timeout, the Spirit Kernel inherits the core's value + a smaller proportion as a consolation prize.?
- Kill the Spirit Kernel at LIMIT 0 for the THE LAST PRESENT bonus. There is a some room for waiting on timing this - don't do it too early.
- If the Spirit Kernel times out, it will kill you.
Segment 8
- Windmills
- Destroying 26 or more total blades (UNNAMED 492 and 490, without UNCHAINing) triggers a swarm of UNNAMED 398 dive-bombers at TIMER 61.
- The UNNAMED 488 MASTER has the largest single UNCHAIN in the game if killed between TIMER 54 and 55. However, for several characters pointblanking and/or bombing each windmill as it scrolls in leads to a bigger Spirit profit.
- UNNAMED 487 (large stones)
- Bombing during this section makes the stones turn invulnerable and spawns lots of ORNITHOPTERs.
Boss: Unnamed 290/HellSinker
- The goal of this boss is to raise its Satisfaction meter to level 3. Doing non-bomb damage to it raises it while not hitting it for awhile will cause it to fall (slowly).
- Hit the boss many times with rapid attacks to fill the meter. Bomb/Discharge damage will cause it to fall very rapidly.
- The Satisfaction level only matters at the moment the sequence ends (TIMER ~389). As the meter can be easily filled during the long penultimate pattern, SOLAR PLEXUS, Discharge can be used relatively freely before then. (For example, to get into position before grazing RHODOPHILIA)
- STELLA lost during the middle non-scoring-critical patterns can be recovered by collecting LUNA droplets en masse during INTEGRAL FORCE. However, letting lots of droplets fall off the screen will cause STELLA to plummet instead, so make sure not to kill archives indiscriminately.
- Deadliar is capable of an advanced trick where held Discharge invincibility is used to supergraze the final QUASAR pattern, and then refill the empty Satisfaction meter with level 2 subweapon damage at the last second.
- Each pattern during this phase is static. They can be practiced in Segment Location. Use this to your advantage.
- Whenever an attack during this phase ends (based solely on time), the boss will drop 6 Life Chips. This can be used to gain a couple extra lives/Immortality bonuses.
- Based on your Satisfaction level at the end of this boss, an extra boss will be spawned.
Boss: GARLAND
- Requires Satisfaction level 3. This boss can potentially lead to the TLB and the true end.
- Your goal is to fill its health bar to max by dealing damage. This will unlock the TLB.
- Beyond this mechanic, GARLAND is invincible (but still should be shot for score).
- This phase will last 102 seconds.
- In the initial "rings" patterns only, damaging GARLAND will produce Spirits. After these patterns, damaging it will only produce Spirits after the meter has been filled.
- The giant green lasers can be used to damage GARLAND if the white hexagonal shielding pieces are destroyed.
- In this part of the game only, enemy Misteltoe bullets can be cancelled. These bullets will cancel into Life Chips rather than Ingots. GARLAND will do this three times, at LIMIT 80, LIMIT 07, and LIMIT 00. Keep as many of these bullets on the screen as possible to earn your last extends of the run.
Boss: Lost Property 771
- The TLB.
- Like GARLAND, completely invincible, but it's worth shooting it.
- This boss is pure survival, and lasts around 74 seconds.
